Consumer Alert: The Hidden Water Damage Risk in UK Bathrooms—Is Your Shower Seal Failing?
A quiet drip after every shower might seem like a harmless inconvenience. But for many UK households, a worn or failing shower seal can turn into a costly repair nightmare. Hidden moisture, slow leaks, and unnoticed puddles often lead to mold growth, rotting flooring, and long-term structural damage. This UK homeowner’s guide to fixing a shower door bottom drip seal is designed to help you understand the risks, spot the early warning signs, and take practical steps to protect your bathroom before damage sets in. You can also explore reliable replacement options such as those found here: UK homeowner’s guide to fixing a shower door bottom drip seal.
Why Shower Door Bottom Drip Seals Matter More Than You Think
Most homeowners don’t realise how crucial the bottom seal is to the entire shower system. Its job may look simple, but it’s the main barrier preventing water from escaping onto your bathroom floor. When this seal wears out, becomes stiff, or cracks, water begins to escape—sometimes slowly enough that it goes unnoticed for months.
A small leak can work its way under tiles or flooring. Once mold starts to grow in these hidden areas, repairs become more extensive and expensive. For older UK homes with timber floors, the risks are even higher. Moisture can cause the wood to swell and eventually rot, potentially damaging the subfloor.
That’s why learning how to inspect, maintain, and replace a shower door drip seal is not just a cosmetic task—it’s an essential part of home maintenance.
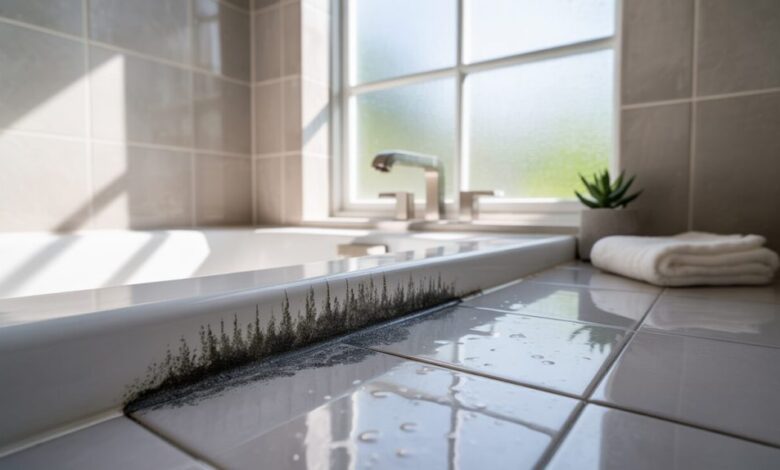
The Hidden Damage Caused by a Bad Seal
Water leaks are sneaky. You may only notice a tiny puddle after each shower, but the real
damage often happens beneath the surface.
1. Mould and Mildew Growth
Moisture trapped around the shower enclosure creates the perfect environment for mold spores to thrive. Even a slow, intermittent leak can cause mold to grow behind panels or under flooring. For households with children or individuals prone to allergies, this becomes a health concern.
2. Floor Damage
Laminate floors, even those labelled as water-resistant, are no match for continuous moisture exposure. The edges begin to warp, the boards discolour, and in severe cases, the entire floor must be replaced.
Bathroom tiles can suffer too. Water may seep into grout lines, weakening them over time. This causes tiles to loosen and crack, creating further leak points.
3. Structural Problems
In multi-story homes, a long-term leak from an upstairs bathroom can damage ceilings, electrical wiring, and support beams. What began as a £10 seal issue can quickly escalate to thousands in repairs.
Identifying When Your Shower Door Seal Is Failing
Not all damage happens overnight. Early detection is key. Here are the signs every UK homeowner should watch for:
Water Escaping From the Bottom of the Door
This is the most obvious symptom. If you notice water pooling outside your shower door, your seal may no longer be performing effectively.
Visible Cracks or Hardening
Bottom seals gradually lose flexibility due to soap, minerals, and temperature changes. If the seal looks brittle or split, replacement is necessary.
Loose Fit on the Glass
A seal should grip the door snugly. If it slides off easily or shifts during opening and closing, it’s no longer providing an effective barrier.
Mould on the Seal Itself
Black mold along the bottom edge of the seal is a sign that water has been lingering in the wrong places.
Damp Smell in the Bathroom
Persistent damp odours hint at trapped moisture—often caused by a seal that isn’t holding water inside the enclosure.
Why UK Bathrooms Are Especially Vulnerable
Many UK homes have compact bathrooms with limited ventilation. High humidity levels and daily use mean that even minor leaks can quickly escalate into major problems.
Additionally, colder temperatures during autumn and winter cause seals to harden more quickly. Combined with constant exposure to hot water, this accelerates wear and tear.
For older homes with wooden floor structures, the stakes are even higher. Even a minor leak can start a chain reaction of swelling, warping, and structural instability beneath the tiles or vinyl flooring.
How to Fix or Replace a Bottom Drip Seal
Fortunately, replacing a shower door drip seal is one of the simplest DIY tasks homeowners can take on.
Step 1: Measure Your Existing Seal
Before buying a replacement, measure the thickness of your shower door glass and the length of the seal. Most doors in the UK use either 4mm, 6mm, 8mm, or 10mm glass.
Step 2: Remove the Old Seal
Most bottom seals simply slide off. Grip firmly and pull downward. Clean the glass edge thoroughly to remove any buildup of soap scum or hard water deposits.
Step 3: Fit the New Seal
Slide the new seal onto the door and ensure the drip lip faces inward to direct water back into the shower tray. If the seal is slightly longer, trim it with sharp scissors for a perfect fit.
Step 4: Test for Leaks
Run the shower for a few minutes and check for escaping water. A properly fitted seal should eliminate all drips.
Choosing the Right Replacement Seal
Not all seals are created equal. Look for:
Durable PVC construction
Correct fit for your glass thickness
Good flexibility and a strong drip barrier
Anti-mould material if possible
Easy slide-on installation
Specialised suppliers often offer higher-quality seals than generic hardware stores, ensuring better longevity and performance.
Final Thoughts: Protect Your Home Before Damage
Spreads
Bathroom maintenance may not feel urgent, but ignoring a failing shower door drip seal can lead to costly repairs and hidden structural damage. This UK homeowner’s guide to fixing a shower door bottom drip seal gives you the knowledge to act early and prevent unnecessary stress and expense. To ensure you choose a durable and effective replacement, you can explore reliable options here again: UK homeowner’s guide to fixing a shower door bottom drip seal.
Taking action now protects not just your bathroom—but the entire home you’ve worked so hard to maintain.